
Back Office Training:
Setting up your personalized website – A step-by-step guide
To use your Xooma back office effectively you need three things, an email address, a distributor I.D. number, and a password.
Assuming you’ve got these three things already, let’s start using your back office.
First you’ll need to go to the Xooma website. Enter “http://www.Xoomaworldwide.com” into the address bar of your web browser.
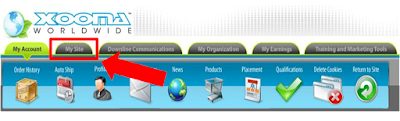
You should see a page that looks similar to the page below. At the top right of the page enter your login and password information and click “Member’s Log in”.


Once you are logged in you’ll be taken to the “Members only” section. Here you can see Distributor specific information. Many pages on the XOOMA website contain “Member Only”information. That you can’t see unless you log in. You should always log in when you visit the XOOMA site to get the information available to you.

Now it’s time to create your personalized website.
Start By Clicking “My Site” Tab.
Once you click on “My Site” Tab a row of Icons will appear.
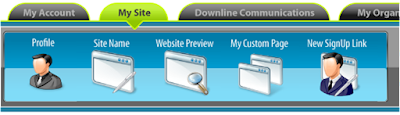
These Icons list the main controls for your replicating site.
By Clicking on your Site profile you can access the information displayed to future prospects. The top portion of the “Edit Site Profile” menu allows you to change:
1. The site name as it appears to your prospects, Please Note this is not the replicating site
address URL:(www.xoomaworldwide.com/xxx) this is simply the name that will show up
on the home page.
2. The Contact Number to Display
This allows you to choose to display a contact phone number by checking the box to
display that number. It also has an open information field to put the number you would
like to display.
3. The Email address to Display
This allows you to choose to display a contact email by checking the box display e-mail.
It also has an open information field to put the e-mail address you would like to display.
4. Custom Link Page.
The Custom link page name will allow you to create a separate link from your home page
to a custom page which you can use to share information about yourself.
5. Hide PC option
This button allows you to choose to display the Preferred Customer option. Preferred
Customers are direct customer in your organization learn more about how they work in
your business please visit :
This button allows you to choose to display the Preferred Customer option. Preferred
Customers are direct customer in your organization learn more about how they work in
your business please visit: http://www.xoomaworldwide.com/content/pdfs/Xooma_Xcel_Prosperity_Plan_Current.pdf.
6. Show or Hide Bottle Offer
7. Allow Multi Item Sign Up this option allows your prospective team members join with several items.
By Clicking on the “Site Name” Icon you can access the name of your site URL. So you can change what goes after the “/” in your replicating Site name (i.e.Xoomaworldwide.com/xxxx).

The website preview icon will allow to see the changes that your have made to your Xooma worldwide site with out having to log out of your back office.
This is an optional feature which can be used at any time. This Icon allows you to access your Custom Site. This Site is what prospects will see once you have created a custom page link for your home page in site profile. Your Custom Page is allows you to share important information and leave a unique impression on a prospect who sees your site. You can use HTML Tags to show images and help to format your text.
*To Learn more about HTML please visit http://webdeveloper.com/html/beginners_html.html.

This Icon allows you to access a custom link generator that will tailor a link for a new prospect and allow you to further control what they see. This can be extremely effective for sharing a specific product with your prospect.
No comments:
Post a Comment